 Try lt Free
 Recovery success rate of up to
To address the issue of removing the write protection from a Majorgeeks USB stick, we’ll walk through a step-by-step, detailed process.
1. Write Protection
Write protection on a USB stick means that files cannot be written to the drive, modified, or deleted. This can be caused by several reasons, including hardware switches, software settings, or operating system restrictions. When your USB is write-protected, you won’t be able to save data to it, copy files, or perform most actions that involve writing data.
2. Common Causes of Write Protection
Before diving into the solutions, it’s helpful to understand the common reasons write protection might be enabled:
Physical Write Protection Switch: Some USB drives have a small physical switch that enables or disables write protection. This switch is usually located on the side or bottom of the USB drive.
Operating System Settings: Windows and other operating systems can sometimes enforce write protection, either due to file system issues or group policy settings.
Corrupt File System: If the file system on the USB drive becomes corrupted, the system might lock the drive in a write-protected state.
Antivirus or Security Software: Some antivirus programs can apply write protection to prevent malware from infecting a drive, or to safeguard data.
Bad Sectors or Disk Errors: Physical issues with the USB stick, such as bad sectors, can trigger write protection to prevent further damage to the device.
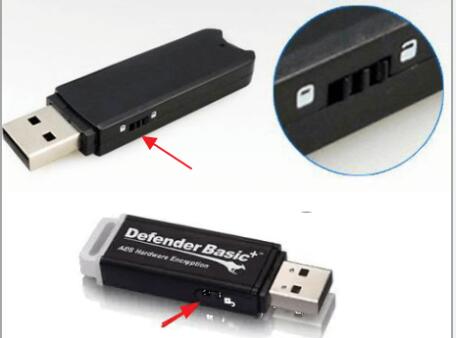
3. Method 1: Checking for a Physical Write Protection Switch
Many USB drives come with a tiny slider switch that can be toggled to enable or disable write protection. It’s essential to check if your Majorgeeks USB stick has such a switch.
Steps:
Look carefully at the sides of the USB stick. Some drives have a small slider or switch with two positions: one for “read-only” (write-protected) and one for “write-enabled.”
If you find the switch, slide it to the “off” position to disable write protection.
Plug the USB drive back into your computer and try writing data to it.
If this method solves the issue, you’re done. If the write protection remains, proceed to the next steps.
4. Method 2: Using Diskpart to Remove Write Protection
Windows provides a command-line tool called Diskpart, which can be used to manage storage devices, including USB drives. If the write protection is not controlled by a physical switch, it could be due to a system setting that can be changed using Diskpart.
Steps:
Open Command Prompt: Type “cmd” in the Windows search bar and right-click the Command Prompt application. Select “Run as Administrator” to open an elevated command prompt.
Launch Diskpart: In the command prompt window, type diskpart and press Enter. This will launch the Diskpart utility.
List Available Disks: Type the following command to list all disks connected to your computer:
复制编辑
list disk
Find the number associated with your Majorgeeks USB stick. For example, if your USB drive is Disk 1. then you will refer to it as Disk 1 in the next steps.
Select Your USB Drive: Use the following command to select your USB disk:
bash
复制编辑
select disk X
Replace X with the actual disk number corresponding to your USB stick.
Remove Write Protection: Type the following command to remove write protection:
arduino
复制编辑
attributes disk clear readonly
This command tells Diskpart to clear the read-only attribute from the USB drive.
Exit Diskpart: Type exit to exit Diskpart.
Test the USB Drive: Close the Command Prompt and test the USB stick again to see if the write protection is removed.
5. Method 3: Using the Windows Registry Editor
If Diskpart didn’t work, there may be a registry setting causing the write protection. You can manually check and modify these settings using the Windows Registry Editor.
Steps:
Open the Registry Editor: Press Windows + R to open the Run dialog. Type regedit and press Enter.
Navigate to the USB Storage Key: In the Registry Editor, navigate to the following path:
mathematica
HKEY_LOCAL_MACHINE\SYSTEM\CurrentControlSet\Control\StorageDevicePolicies
Modify the WriteProtect Value:
If you see a WriteProtect key in the right-hand pane, double-click it.
Change its value from 1 (write-protected) to 0 (write-enabled).
If the WriteProtect key does not exist, right-click on the empty space in the right-hand pane, select New > DWORD (32-bit) Value, and name it WriteProtect. Set its value to 0.
Exit the Registry Editor: Close the Registry Editor and restart your computer.
Test the USB Drive: After the restart, check if the USB stick is no longer write-protected.
6. Method 4: Using Group Policy Editor (Windows Pro or Enterprise)
If you’re using Windows Pro or Enterprise, you can remove write protection through the Group Policy Editor. This method might be useful if your system has restricted write access for security reasons.
Steps:
Open the Group Policy Editor: Press Windows + R to open the Run dialog. Type gpedit.msc and press Enter.
Navigate to the Removable Storage Policies: In the Local Group Policy Editor, go to:
sql
Computer Configuration > Administrative Templates > System > Removable Storage Access
Disable Write Protection:
In the right-hand pane, find the policy named “Removable Disks: Deny write access.”
Double-click on it and select “Not Configured” or “Disabled.”
Click Apply and OK to save the changes.
Test the USB Drive: After making this change, test the USB stick to see if the write protection is removed.
7. Method 5: Formatting the USB Stick
If none of the above methods work, your final option is to format the USB drive. Keep in mind that this will erase all data on the drive, so be sure to back up any files if possible.
Steps:
Open Disk Management: Right-click on the Start menu and select “Disk Management.”
Locate the USB Drive: In the Disk Management window, locate your USB drive. It will appear as a removable disk.
Format the USB Drive: Right-click on the USB drive and select “Format.” Choose the desired file system (e.g., NTFS, exFAT, FAT32), and make sure to uncheck “Quick Format” if you want a thorough format.
Confirm the Format: Click OK to confirm the format process. This will erase all data on the USB stick but should remove any write protection issues.
Test the USB Drive: Once the format is complete, test the USB stick to see if the write protection has been removed.
8. Method 6: Using Third-Party Software
If all else fails, you can try using third-party disk management or repair tools. Some popular options include:
SD Formatter: This tool is especially useful if you’re dealing with SD cards but can also work for USB drives.
EaseUS Partition Master: This partition tool offers more advanced features, including the ability to remove write protection.
HP USB Disk Storage Format Tool: This is an older but effective tool that can sometimes bypass write protection on USB drives.
About us and this blog
Panda Assistant is built on the latest data recovery algorithms, ensuring that no file is too damaged, too lost, or too corrupted to be recovered.
Request a free quote
We believe that data recovery shouldn’t be a daunting task. That’s why we’ve designed Panda Assistant to be as easy to use as it is powerful. With a few clicks, you can initiate a scan, preview recoverable files, and restore your data all within a matter of minutes.
Subscribe to our newsletter!
More from our blog
See all posts


