 Try lt Free
 Recovery success rate of up to
Removing a hard drive from a computer is a critical task that users might need to perform for upgrading, replacing, or salvaging data. Whether you’re working with a desktop or a laptop, this guide will walk you through each step of the process safely and thoroughly, ensuring your hardware remains intact and your data secure.
1. Why and When You Need to Remove a Hard Drive
There are several scenarios in which removing a hard drive is necessary:
Upgrading to a solid-state drive (SSD)
Replacing a failing hard disk
Salvaging data from a non-bootable system
Transferring storage to another device
Recycling or disposing of an old computer
2. Safety First: Preparation and Precautions
A. Backup Your Data Before touching any hardware, back up your data using cloud services or external storage to prevent loss.
B. Power Down and Unplug
Shut down the computer completely.
Unplug the power cable.
Press the power button for 5–10 seconds to discharge residual power.
C. Ground Yourself Use an anti-static wristband or touch metal to discharge static electricity.
D. Assemble Tools
Small Phillips-head screwdriver
Anti-static mat or wrist strap
External enclosure (optional)
3. Identify the Type of Computer and Drive
A. Desktop or Laptop?
Desktops typically have 3.5-inch drives.
Laptops usually contain 2.5-inch drives.
B. HDD or SSD?
Identify the type by checking the specs or by visual inspection.
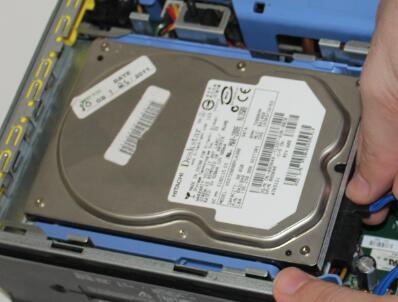
4. Removing a Hard Drive from a Desktop Computer
A. Access the Case
Lay the tower on its side.
Remove side panel screws (usually Phillips-head).
Slide the panel off carefully.
B. Locate the Hard Drive
Usually found in a drive bay, mounted with brackets or rails.
C. Disconnect the Cables
Remove SATA (data) cable.
Remove SATA power cable (from PSU).
D. Unscrew or Slide the Drive Out
Drives may be secured with screws or with tool-less clips.
Carefully slide or lift the drive out.
E. Store the Drive Safely
Place the drive in an anti-static bag.
5. Removing a Hard Drive from a Laptop Computer
A. Access the Drive Bay
Turn off the laptop and remove the battery (if applicable).
Remove the back panel screws.
Locate the drive bay (usually labeled).
B. Disconnect the Drive
Carefully detach the SATA or ribbon cable connector.
Some drives are enclosed in a caddy; unscrew it.
C. Slide Out the Drive
Pull gently until the drive slides free.
D. Protect the Drive
Place it in a static-safe bag or external enclosure.
6. Special Cases: All-in-One PCs and Ultrabooks
A. All-in-One PCs
Access usually from the back or bottom.
Use suction cups and plastic prying tools for screen removal.
B. Ultrabooks or MacBooks
Require specialized screwdrivers (e.g., Torx or Pentalobe).
Drives may be soldered; removal not always possible.
7. Handling and Storing the Drive Post-Removal
A. Anti-Static Safety
Always store in an anti-static bag.
B. Avoid Drops or Vibrations
Hard drives are sensitive to physical shock.
C. Label the Drive
Include details like model, capacity, and extraction date.
8. Reusing or Recycling the Hard Drive
A. Use as External Storage
Place the drive in a USB enclosure.
Format and reuse for backups or file transfer.
B. Securely Wipe the Drive
Use tools like DBAN, CCleaner, or manufacturer utilities to erase data.
C. Recycle Responsibly
Use certified e-waste recycling centers.
9. Installing a New Hard Drive (Optional Bonus)
A. Align and Mount
Slide the new drive into the bay.
Secure with screws or tool-less locks.
B. Connect SATA and Power Cables
Match connectors to ports.
C. Boot and Format
Boot into BIOS to check recognition.
Format via Windows Disk Management or Mac Disk Utility.
10. Troubleshooting Common Issues
Drive Won’t Come Loose:
Check for hidden screws or locking tabs.
Computer Doesn’t Recognize New Drive:
Reseat cables.
Initialize the drive in Disk Management.
Can’t Find the Drive in BIOS:
Check SATA settings (AHCI/IDE).
11. Frequently Asked Questions (FAQs)
Q: Can I remove a hard drive without losing data? A: Yes, if you power off the system properly and handle the drive with care.
Q: Is removing a hard drive safe for the computer? A: Absolutely, as long as proper static and power precautions are followed.
Q: What if the drive is encrypted? A: You will need the decryption key to access the data externally.
Q: Can I swap hard drives between laptops or desktops? A: Only if the form factor and interfaces are compatible.
About us and this blog
Panda Assistant is built on the latest data recovery algorithms, ensuring that no file is too damaged, too lost, or too corrupted to be recovered.
Request a free quote
We believe that data recovery shouldn’t be a daunting task. That’s why we’ve designed Panda Assistant to be as easy to use as it is powerful. With a few clicks, you can initiate a scan, preview recoverable files, and restore your data all within a matter of minutes.
Subscribe to our newsletter!
More from our blog
See all posts


