 Try lt Free
 Recovery success rate of up to
Removing write protection from a hard disk drive (HDD) can be essential when you encounter issues like not being able to add, delete, or modify files on the disk. This write protection can be triggered by various factors such as hardware settings, software conflicts, or issues within the operating system.
1. Write Protection
Write protection is a feature that prevents any changes to the contents of a disk. This feature can be set either by a physical switch on the disk or through software within the operating system. While this protection is useful for preserving data, it can be frustrating when you’re trying to modify or delete files.
Write protection can be implemented at various levels, including:
Physical write protection: Some external HDDs come with a physical write protection switch that, when enabled, prevents any changes to the drive.
Software-level write protection: At the software level, Windows, macOS, or the HDD’s firmware can enforce write protection on a disk to prevent modifications.
Understanding whether the write protection is at the hardware or software level is crucial before attempting any fixes.
2. Identifying the Write Protection Status
Before proceeding with the steps to remove write protection, it’s important to first identify the write protection status of your HDD. Here are a few methods to check:
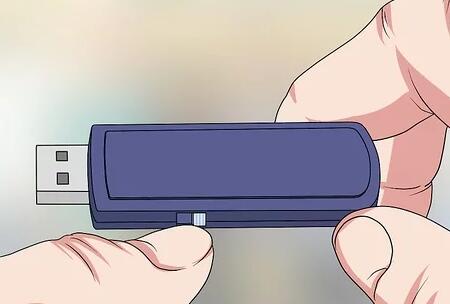
A. Check for a Physical Write Protection Switch
Some external hard drives, especially USB drives or SD cards, come with a small switch that can enable or disable write protection. This switch is typically located on the side or bottom of the device.
If your HDD has this switch, check if it’s set to the “Lock” or “Write Protected” position.
If it is locked, move the switch to the “Unlock” position, and check if the write protection issue is resolved.
B. Check in Windows Disk Management
Open Disk Management:
Right-click on the Start menu and select Disk Management.
Locate your HDD:
In the Disk Management window, locate your HDD. Right-click on it to see the available options.
Check for a “Write Protected” message:
If the disk is write-protected, Windows will usually display a message indicating that the drive is write-protected.
C. Use Command Prompt to Check
You can also use Command Prompt to check for write protection.
Open Command Prompt:
Press Windows + R, type cmd, and press Enter.
Run Diskpart:
Type diskpart and press Enter to open the DiskPart utility.
Type list disk to view all disks connected to your system.
Identify your HDD by its size and note the corresponding disk number.
Type select disk X (where X is the disk number of your HDD).
Type attributes disk to check if the disk is write-protected.
3. Methods to Remove Write Protection
A. Check for Physical Write Protection Switch
If your external HDD has a physical write protection switch, the simplest solution is to move the switch to the “Unlock” position. This is the most straightforward fix if the protection is hardware-based.
B. Using Diskpart Command to Remove Write Protection
If the issue is software-based, you can use the Diskpart utility to attempt to remove write protection. Here’s how to do it:
Open Command Prompt as Administrator:
Press Windows + R, type cmd, and press Ctrl + Shift + Enter to run it as an administrator.
Open Diskpart:
In the Command Prompt, type diskpart and press Enter.
List all disks:
Type list disk to display all the disks connected to your computer. This will show you a list of all available drives.
Select your HDD:
Identify your HDD by its size and type select disk X (replace X with the disk number).
Remove write protection:
Type attributes disk clear readonly and press Enter. This command will attempt to remove the write protection from the selected disk.
Exit Diskpart:
Type exit and press Enter to close the Diskpart utility.
Check your drive:
After completing these steps, check if the write protection has been removed by trying to modify files on the drive.
C. Modify Windows Registry to Remove Write Protection
In some cases, Windows Registry settings may have enabled write protection. Here’s how to remove it:
Open the Registry Editor:
Press Windows + R, type regedit, and press Enter.
Navigate to the USB Write Protection Key:
In the Registry Editor, navigate to HKEY_LOCAL_MACHINE\SYSTEM\CurrentControlSet\Control\StorageDevicePolicies. If the StorageDevicePolicies folder doesn’t exist, you may need to create it.
Modify the WriteProtect value:
In the StorageDevicePolicies folder, find the WriteProtect key. Double-click on it, and change the value from 1 (enabled) to 0 (disabled).
If the WriteProtect key does not exist, right-click in the right pane, select New > DWORD (32-bit) Value, name it WriteProtect, and set its value to 0.
Close Registry Editor:
After making this change, close the Registry Editor and restart your computer.
Check if the write protection is removed:
After the system reboots, check if you can now write to the HDD.
D. Format the Drive to Remove Write Protection
If none of the above methods work, formatting the HDD is a final step that can remove the write protection. Note: Formatting the drive will erase all data on it, so make sure to back up your files before proceeding.
Open Disk Management:
Right-click on the Start menu and select Disk Management.
Format the Drive:
Right-click on your HDD and select Format.
Choose the desired file system (e.g., NTFS, exFAT, or FAT32) and click OK.
Check the Drive:
After the format is complete, check if you can now write to the drive.
E. Use Third-Party Software
If the built-in Windows tools fail to remove write protection, you can use third-party disk management tools. Some reliable options include:
EaseUS Partition Master: This tool can help format and manage partitions and can often resolve issues like write protection.
AOMEI Partition Assistant: Similar to EaseUS, AOMEI provides disk management solutions that may help in clearing write protection.
These tools offer user-friendly interfaces and may provide more flexibility than the default Windows utilities.
F. Update or Reinstall Disk Drivers
Sometimes, outdated or corrupted drivers can trigger write protection on your HDD. Here’s how to update or reinstall the disk drivers:
Open Device Manager:
Press Windows + X and select Device Manager.
Update Disk Drivers:
Expand the Disk Drives section, right-click on your HDD, and select Update Driver.
Follow the on-screen instructions to search for and install any available updates.
Reinstall Disk Drivers:
If updating the drivers doesn’t work, right-click on the HDD in Device Manager and select Uninstall Device.
Restart your computer, and Windows will automatically reinstall the drivers.
Check if Write Protection is Removed:
After reinstalling the drivers, check if you can now write to the HDD.
4. Additional Troubleshooting Tips
Check for Malware: Sometimes, malicious software can cause write protection issues. Run a full system scan using an antivirus program to ensure your system is clean.
Check Disk for Errors: Use the built-in chkdsk utility to check for errors on the drive that might be causing write protection.
Open Command Prompt as an administrator.
Type chkdsk X: /f (replace X with the drive letter of your HDD) and press Enter.
Allow Windows to scan and repair any errors on the drive.
Try the Drive on Another Computer: If you continue to face issues with the write protection, try connecting the HDD to another computer to see if the problem persists. This can help determine if the issue lies with the drive or your computer.
About us and this blog
Panda Assistant is built on the latest data recovery algorithms, ensuring that no file is too damaged, too lost, or too corrupted to be recovered.
Request a free quote
We believe that data recovery shouldn’t be a daunting task. That’s why we’ve designed Panda Assistant to be as easy to use as it is powerful. With a few clicks, you can initiate a scan, preview recoverable files, and restore your data all within a matter of minutes.

