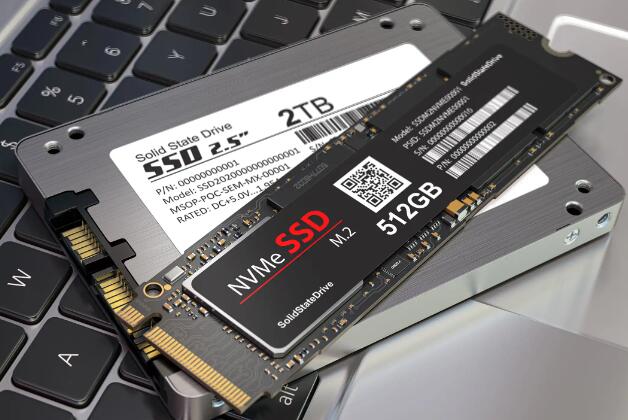
In the evolving world of PC building, Gigabyte’s B650 motherboards offer an attractive balance of performance, future-proofing, and value, especially for users adopting AMD’s Ryzen 7000 series processors. However, encountering issues such as the motherboard not detecting an SSD drive can be frustrating and confusing particularly when the drive is brand new, or the system was running fine previously.
BIOS does not list the SSD.
Windows installation cannot find the drive.
Drive shows up intermittently or not at all.
Boot errors like “No Boot Device Found.”
Drive is not visible in Disk Management or Device Manager.
Unexpected crashes or freezes during POST (Power On Self-Test).

Understanding these symptoms can help you identify whether the issue is hardware-related, BIOS-related, or software-related.
Main Causes Why Gigabyte B650 May Not Detect Your SSD
Several reasons could be behind the problem. Here are the most common:
Incorrect M.2 or SATA Installation:
Improperly seated SSDs are a major culprit.
Unsupported SSD Type:
Certain ports only support specific types (e.g., PCIe 4.0 NVMe vs SATA M.2).
Outdated BIOS:
Older firmware might not recognize newer drives or new features.
Incorrect BIOS Settings:
Drive mode (AHCI, NVMe, RAID), secure boot, or CSM settings could be wrong.
Faulty SSD or Motherboard Slot:
Physical defects in the SSD or motherboard M.2/SATA slot.
Driver Issues:
Missing storage drivers in Windows setup or OS.
Power and Cable Problems (for SATA SSDs):
Loose or faulty cables can prevent detection.
Step-by-Step Troubleshooting Guide
Step 1: Basic Hardware Checks
1. Re-seat the SSD
Remove the SSD and reinstall it carefully:
For M.2 SSDs, ensure it is inserted at an angle (~30 degrees) and screwed down.
For SATA SSDs, double-check both power and data cables are firmly attached.
2. Try Another Port
B650 motherboards often have multiple M.2 slots.
Some slots may share bandwidth with SATA ports — causing conflicts.
3. Test SSD on Another System
If possible, check the SSD on a different PC.
This will rule out a defective drive.
4. Inspect the SSD and Motherboard
Look for any visible damage, bent pins, or burned components.
Step 2: BIOS Troubleshooting
1. Update the BIOS
Many early B650 boards shipped with firmware that needed updates for full device compatibility.
Visit Gigabyte’s official website.
Download the latest BIOS for your motherboard model.
Follow instructions for Q-Flash update.
2. Check Boot Mode
Enter BIOS and verify:
CSM (Compatibility Support Module) is Enabled if installing Windows 10/older OS.
For pure UEFI boot, disable CSM.
3. Set Storage Configuration Properly
For SATA drives: Ensure controller is in AHCI mode.
For NVMe M.2 drives: Storage device should be set to NVMe and boot priority set correctly.
4. Verify NVMe Configuration
Some slots are wired directly to the CPU or chipset — check your motherboard manual to ensure correct usage:
Top M.2 slot usually supports PCIe Gen 5 or 4 drives.
Lower slots may only support PCIe Gen 4/3.
5. Reset BIOS Settings
If nothing helps, try clearing CMOS:
Turn off your PC.
Remove the battery on the motherboard for 5 minutes.
Reinsert and reboot.
This can help reset corrupted settings.
Step 3: Windows and Driver Solutions
1. Disk Management Check
Sometimes Windows sees the drive, but it’s uninitialized:
Right-click Start > Disk Management.
If the SSD appears as unallocated, initialize it (GPT recommended).
2. Install NVMe/SATA Drivers
Windows Setup sometimes needs extra drivers:
Download AMD chipset drivers (includes NVMe drivers) from Gigabyte or AMD’s website.
3. Fresh Windows Installation
If installing Windows:
Choose “Load Driver” at drive selection screen if SSD not showing.
Insert driver USB if needed.
4. Drive Letter Conflict
If a drive lacks a letter, assign one manually:
In Disk Management, right-click the volume > Change Drive Letter and Paths.
Step 4: Advanced Checks
1. Check SSD Firmware
Manufacturers occasionally release critical firmware updates for drives.
2. M.2 Slot Bandwidth Conflicts
On some motherboards:
Using M.2_1 disables certain SATA ports.
Consult your B650 manual for bandwidth sharing limitations.
3. PCIe Version Settings
Some drives have trouble when PCIe lane settings are too aggressive:
Set M.2 PCIe settings to Gen 3 instead of Auto/Gen 4/5.
4. Power Supply Issues
Low-quality PSUs or underpowered systems can fail to power M.2 SSDs properly.
Ensure your PSU is sufficient.
Special Case: B650 and PCIe 5.0 M.2 SSDs
Gigabyte B650 motherboards can technically support PCIe Gen 5. but very few drives exist yet.
Many users mistakenly configure Gen 5 settings while using Gen 4 or Gen 3 SSDs.
Solution:
Manually set the M.2 slot to Gen 4 in BIOS.
Let the motherboard auto-detect if unsure.
Real-World Scenarios and Fixes
Scenario 1: New Build, Drive Not Detected
Update BIOS immediately.
Clear CMOS.
Reinstall SSD carefully.
Scenario 2: System Previously Working, Now Missing SSD
Inspect for hardware failures (SSD or slot).
Check if Windows updates or BIOS updates caused changes.
Roll back if necessary.
Scenario 3: SSD Detected in BIOS but Not in Windows
Initialize the SSD in Disk Management.
Install latest chipset/storage drivers.
How to Update BIOS on Gigabyte B650
Here’s a safe procedure:
Download the latest BIOS from Gigabyte’s official site.
Format a USB stick to FAT32.
Copy the BIOS file to the USB drive.
Reboot your PC and enter BIOS (press Del key at startup).
Launch Q-Flash utility.
Select the BIOS file and start the update.
Do not turn off power during update.
After updating, recheck if the SSD appears.
Tips to Avoid SSD Problems on B650 Boards
Always install the SSD in the correct slot according to the manual.
Avoid using budget SSDs without DRAM cache for system drives.
Update BIOS and drivers regularly.
Use high-quality PSUs to avoid unstable voltage.
Label your SATA cables for easier troubleshooting if using multiple drives.
A Gigabyte B650 not reading an SSD can feel like a show-stopper — but in most cases, the solution is straightforward. Whether it’s a loose connection, an outdated BIOS, an improper setting, or a hardware mismatch, carefully following troubleshooting steps will usually solve the problem.
About us and this blog
Panda Assistant is built on the latest data recovery algorithms, ensuring that no file is too damaged, too lost, or too corrupted to be recovered.
Request a free quote
We believe that data recovery shouldn’t be a daunting task. That’s why we’ve designed Panda Assistant to be as easy to use as it is powerful. With a few clicks, you can initiate a scan, preview recoverable files, and restore your data all within a matter of minutes.
Subscribe to our newsletter!
More from our blog
See all postsRecent Posts
- How to recover lost files on sd card 2025-07-18
- How do i recover a lost document in word 2025-07-18
- How to recover lost files on windows 10 2025-07-18

 Try lt Free
 Recovery success rate of up to


